Monday, June 15, 2009

9 months and counting....

And so it continues. The longest bathroom renovation on record, I believe. At least it is the longest in a house where humans live. I teeter on insanity and the disbelief that it will ever be done-- or that I will actually live long enough to see it actually completed, much less get to take a shower or brush my teeth in it. The tile guy started on May 18; he was supposed to be done in less than a week. Actually, he only "stopped" by on May 18. Apparently, the tile wasn't in and he had to wait for them to unload a truck to get it. So, he came the next day to work... but, alas, still no tile. However, he was kept busy scraping old paint off the molding that was going up around the windows and doors and then spent the next few days reinstalling all of it. I can't complain about that too much, I should have known that needed to be installed first. The next week, week #2, was spent waiting on more tile. Apparently not enough of the right tile was ordered and when the the additional tile came in, it was the wrong color (off-white vs. white= big difference). However, some tile did make it onto the walls. Week three involved laying the radiant heat flooring and then pouring a floor leveling compound that raised the height of the floor (pre-tile) to about an inch and a half ABOVE the concrete board. Considering that the concrete board was already sitting on the same level of finished wood flooring we were going to utilize in the hallway outside the bathroom, this inch and half was a huge shock and concern. The bathroom door will have to be cut down and we have somewhat of a "step" up into the bathroom. After a minor meltdown (stress and time taking their toll), the tile guy explained that he had to raise the middle of the floor up (the b/w field tile) to meet the height of the thicker granite for the border (nevermind that I had never actually wanted granite-- I had asked for black marble, but I was definitely not going to make a case for that now). So... once the concrete leveling compound dried, George (the tile guy) could now lay the tile. Doh! Not so quick! His saw was not working and so he had to cut the tile by hand-- thus ensuing more labor and more time. After cutting most of the tile, he laid it out on the floor and placed the black granite around it (as you'll see in the pictures). He spent most of last week laying the black granite (with a huge amount of mastic underneath)around the border of the room. However, that is where we stop-- right at the finish line. Week 5... has slowed to a halt. Apparently, all that is left is adhering the field tile (tile in the middle of the room) to the floor and grouting it (once it is dried)-- but it has been nearly a week since they have done any work here. I'd like to say "Calgon, take me away"... but since I need a bathroom for that, I can't even make those kinds of statements.  


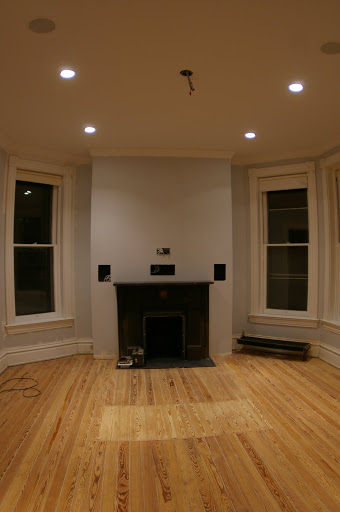
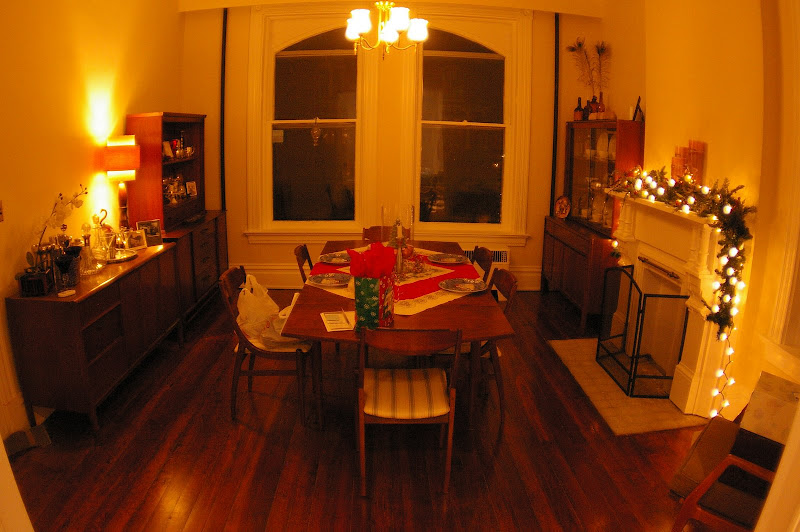
Anyway, here are some pictures for you to see. I'm sure it looks like a lot of progress, but remember, you aren't living through it and it has been over NINE MONTHS! I'm just hoping we will be in before 10-- or at least soon after. We still have to order the marble countertop, get the plumbing hooked up and have the tub reglazed and about 10 other random things (paint, finish cabinet, etc., etc.).... like I said... I'm hoping to enjoy it before I die.

Wednesday, January 28, 2009

Bathroom Renovation

It has been awhile since our last post and we are now in the midst of a bathroom renovation.

Just to fill you in on the details; the pre-existing condition was arranged so that there was a closet just outside the bathroom and a small "hallway" that led to the bathroom door. The interior (as you'll see) had been "updated" from the original Victorian decor to a rather psychedelic '70's style. The original layout included only a bathtub (aside from the toilet and sink). So, we previously didn't rely on this bathroom to bathe.
The fact that we weren't used to using this bathroom for everyday activities has helped us to get through the renovation process with a little less pain. Still, we are very anxious to get it done.

The new bathroom design has included taking out the closet and original bathroom wall (adjacent to closet) and expanding it by about 3 feet. While this is not a huge addition, it does allow us to change the circulation and give more space to the bathroom without losing any in the back hallway. We also had a wall put in behind the tub to run plumbing for a shower and also had the plumbing roughed in for the attic. This will allow us to have another bathroom in the attic once/if we get that space finished. The electric has been installed and now we are waiting on dry wall and tile to finish up the job (not to mention re-installing the toilet and the sink). Check back for updates.

Tuesday, August 26, 2008

I'm taking donations...

Ok people. If you are reading this blog, I know you are interested in the renovations (there's no use trying to close the page now, I know who you are). So, while you're here, you might as well pay. Yeah, yeah, you "say" you don't have pay pal... ok, maybe you don't. But there are other ways to contribute- even if it is just pennies. You can click on our google links about home renovation (quit yer complaining, you'll need to know the helpful information at some point). We get paid for each click. I don't know how... my computer networker takes care of that (as long as he doesn't scam me and stops buying things from China).

We just found out that we need a new roof. WAAH! If I sounds "whiny" its because I thought we had at least another 5-10 years with the current one. But, since we have had a few leaks (we're talking a moderately soaking shower that pours in from the attic), we have decided to re-evaluate its effectiveness. So, here we are. I would like to spend money on my bathroom (see previous post) or central air (yes, we just went through the 2nd summer w/o air conditioning in most of the livable areas of our house). But, alas, I must wait some more. And, of course, my perfectionist point of view on each project we tackle requires more money than we really want to spend. We are looking at synthetic slate. It is half the cost (or less) than real slate. But, before you get excited, it is still about $390/Square (Square= 100 S.F.). We need 24 squares. Yeah. Uh huh. And, keep in mind, that doesn't include installation or the removal of (what could be.... ASBESTOS) shingles. OR the installation of sheething, nails (they have to be stainless, so we're told), or other incidentals (I think we're funding some kid's college fund somewhere). However, asphalt shingles are not very exciting, especially after you've seen the synthetic slate (think Kia vs. Audi), and when you want to preserve the character of an old house. We have found some synthetic slate on ebay (don't know if I should be worried about purchasing something this big on ebay). It is about 1/3 the cost of the other synthetic slate. The product samples look nice, but are very pliable (I don't know if this makes it any less/more stable). The product is called NewTech synthetic slate. I would love to get someone else's opinion on this product. Please tell me if we are making a big mistake. Or give me some other valid options!

Thursday, August 21, 2008

Slowly seeing Progress


Well, it is that time of year where the summer is starting to wind down and school is gearing up. That also means that the work on the house is taking a back seat to the preparation for my courses. However, the summer was somewhat successful in terms of renovations. We have the central hallway (on both floors) and stairwell about 95% finished. The spindles and the stair risers need to be painted (which I am dreading). In addition, we have to get creative about getting a window treatment installed (it is about 1/8" too wide). But, the fact that we don't have to walk through dust and debris right outside our bedroom is a huge improvement. We have also installed more lighting upstairs, though, the wiring for the switch is still being "tweaked". All of the 3-way switches in the house are somewhat tricky when trying to get them to work from both locations. We also have some furniture to put together and art work to hang.

I am excited to add that we are finally sleeping in our bedroom. We've been in there for about 8 weeks. It is nice to wake up to a fresh, clean space and one that doesn't border on the "Crack-house chic" style. The peeling wallpaper and drooping window treatments begins to get to you after awhile. We also bought a closet unit for the bedroom from IKEA. It has been a tremendous help in organizing my clothes. However, it took us two days (the weekend) to put the thing together! We still have other organizational components to add to the existing closets so that Jimmy has additional storage space. We just haven't been excited about getting into that type of project again. Hopefully that will happen soon.

We are about to start a bathroom renovation upstairs. We have been using the downstairs (minuscule) bathroom for far too long. On top of it being too far away from our bedroom/ clothes, it requires a unique "tango" when both of us are trying to get ready in the morning. We both can't literally stand in the bathroom at the same time. So, one has to hover outside the door, while the other uses the sink. I'm anxious to have a much larger, nicer, more convenient space near our bedroom. I just dread the mess, waiting, and EXPENSE of creating the new space. We'll glad accept any donations anyone wants to send our way.

In the meantime, check out our renovation photos. We have added a few for the spaces I mentioned above. I have also added photos of the dining and living room. Naturally, there are more finishing touches (artwork) that needs to be added. We're slowly trying to afford them as we go along.

Tuesday, June 3, 2008

An update... 6 months later!

Ok, so we have officially been neglecting this blog. It seems like we have slowed down our maddening pace on the renovations, but we are still chugging along. We have a couple finished rooms now. Our living room and dining room are now "live-able" and "dine-able". We still have the office and back hallway to finish downstairs, but for now we have moved our efforts to the 2nd floor. We have the master bedroom about 90% right now. The floors have been sanded, filled, stained, and poly'd. The walls and ceilings patched and painted, recessed lights installed and speakers in the ceiling. We still need to paint the hearth and install an additional electric outlet in the floor, then we can move in.


The upstairs hallway has been sanded and filled. We installed some molding/trim in the hall last weekend. We still need to go back and re-patch some of the walls. Yes, I said "re-patch." We made the mistake early on of using drywall mud on the plaster walls. Folks, don't ever do this! It does not work! It has already started cracking. We have discovered that the best thing to use is a combination of real plaster and a product called Durabond.

Our next step will most likely be to renovate the upstairs bathroom. We are getting really tired of trekking downstairs to the only full functioning shower. We are planning to do some demolition work and remove a closet in order to expand the bathroom. I have a feeling this may be our largest expense to date. We are planning on keeping the fixtures and laying some tile. Megan has drawn up some plans that include constructing some built-in shelves and moving one of the radiators. The plans look nice, so we will see if we can execute them.

We are also about to endure another summer without central air conditioning. We bought a high powered attic fan to alleviate some of the heat for now and we will be installing a few window AC units to make life a little more comfortable. If we make it through this summer without central AC, we will probably attempt to get that installed before next summer. It will be a large expense, but should help the value of the house if we do it right. We got a quote on Geo-thermal with the small, high velocity, pipe ducts. It was not cheap!

We need to do some small exterior repairs in the near future. We have a gutter pipe that is not draining properly and causing some minor leaking into the wall of the back hall. I think the leak has caused some erosion of mortar around some bricks. This will most likely require some re-pointing. We will probably also try to do some exterior painting this summer or fall. We recently stripped and refinished our front screen door. It is beautiful oak with brass hinges and knobs. I will try to post some before and after pics soon. The front door is next on the refinishing list. I think we are staring to master the art of refinishing wood!

So, that is the state of affairs right now. Hopefully, by this time next year we will be finished with the core of the house and moving on to making the attic into live-able space. New pictures coming soon!

Tuesday, January 1, 2008

We've come a long way, baby... and I'm tired!

It is the new year and it has been a while since our last post. I am going to take the time to give all you devoted readers a quick update. We have made considerable progress since the last post. I urge you to check out the renovation photos to see what we have been up to and see an evolution of each space. We are about 90% complete with renovation work in the dining and living rooms. To name a few of our projects: We built a wall, installed a firebox and mantle, sanded, filled, stained, and poly'd the floors, had crown molding installed, painted the walls and trim, put in recessed lighting, put speakers in the wall and ceiling, built a custom media closet, not in that order.

Over our Christmas break we removed the carpet from the downstairs hallways and front steps. Megan is now a mighty staple puller as she is close to perfecting the art. I estimate there were at least 2000 staples in the hall floor and front steps. The hallways have had an initial sanding. We are getting ready to start filling the cracks and sanding the steps. We have accepted the fact that all of this work takes time... lots of time, energy and sweat, not to mention being covered with 100 year-old wood dust and blowing it out of your nose for days! My Dad has been a driving force for the last 2 weeks. He played our alarm clock almost every day by ringing the doorbell at 9 am, ready for work. I have to say I am ready for a little rest. It is time to go back to my day job!

Today we cleaned out our basement and organized things. Since the dining room is mostly complete, we have unpacked boxes and filled the cabinets with the nice dishes and such. This spurred the organization of the basement. I think I filled up the shop-vac with dirt at least 3 times! Now we can walk around down there without feeling so cramped and surrounded by dirt. Labeling all of the Rubbermaid containers will make it easier to find things.

Saturday, July 21, 2007

little by little

I can't believe how much time has gone by since our last post. While there has been quite a bit of progress, I would still like for the progress to go by faster! New pictures are posted in the renovation gallery, so you can view for yourself how much has been completed.

We are still battling the wallpaper- but it is a battle we are conquering more and more each day. Now we just have the upstairs hallway to scrub down (from the glue) with TSP (Titanium Sodium Phosphate powder mixed with warm water). That is probably the worse part of the whole experience. We (throughout the week, I have a small crew of my parents and Jimmy for a few hours on the weekends- as well as a few child laborers that assist in the process) have gone through probably miles of wallpaper- up to 5 and 6 layers thick. However, the sticky, dirty glue residue that remains requires heavy scrubbing. This means that I am up and down a ladder so that every inch is scrubbed. Needless to say, I am developing carpal tunnel in both wrists (they fall asleep often) and I have bruises on my shins. But, I rest easier knowing the walls are good and clean and ready for the next phase.

After all of the scrubbing, which takes almost as long as the wallpaper removal, the walls must be rinsed with warm water (to get rid of powdery residue of the TSP). Once they are dry they can be touched up with joint compound. We have been mostly fortunate in that most of the walls are in good shape. There are a few long (somewhat deep cracks) in almost every room, but overall, they can be touched up easily. We have been relying on Jimmy's dad to do most of the spackling, however, we decided to try it ourselves today. It is not a hard process, but you can't expect it to be perfect the first time you layer on the mixture. The first coat should go on relatively thick- dry- then sanded down. You can repeat this at least one more time until you receive the smoothness you desire.

We had an issue with the plaster in the "dining room" (this may be later referred to as the living room as we are still deciding how to use each of the rooms). It started out as a large, deep crack from ceiling to floor (part of the wall was sunken inward). So, we decided to take out the part that was sunken in (around the window) and repair it using a two-coat plaster process. However, when Jimmy's dad took out that portion of the wall, we noticed that the plaster was applied on brick (not uncommon for an exterior wall) and then on lath within the same horizontal area (somewhat uncommon). Therefore, it was causing the plaster to crack due to the differentiation in the thickness. In addition, as he would tear off the plaster, the other portion of the plaster kept breaking off, too. So, then we decided to remove the plaster in this wall (we rationalized that it would be easier to run electrical outlets and other wiring, as well). Needless to say, this was a very dirty and messy process (everything that was not covered or shut off was covered in a very thick layer of dust). We plan on using gypsum to recover the wall. However, as of now, we have yet to fix the wall (hopefully tomorrow). Of course, I realized, after the wall was down, I could have foregone the wallpaper removal, scrubbing and rinsing. I try not to think about the amount of time that was wasted on that wall. I just hope it looks great when it is installed.

We also have primed the front parlor and pulled up the carpet. The carpet removal was more difficult than one would imagine. First of all the carpet had a tack strip that ran the perimeter of the room (and around the hearth). Jimmy struggled to get this out in some places because they had used extra long nails. Then we had two layers of padding to dispose of. The top layer we were able to pick up and throw away. However, the bottom (black) layer require scraping (because it was glued down- ARG!!!). There were also an abundance of staples every 6-9 inches. Hopefully we will catch a break in some of the other rooms.

Well, that is where we stand right now. Hopefully the next blog won't take as long to post. We will try to do better with posting images and comments about the house! Keep giving us feed back and letting us know what you are up to as well!